Creating virtual machines from templates in Igiko is a feature that allows you to create virtual machines that are actually copies of some pre-prepared virtual machine. If Windows or a Linux distribution is installed on a pre-prepared machine, then when creating a copy, you can configure the server name, administrator credentials, and network adapter settings.
For example, you can install Windows or Linux on a virtual machine, install additional software, and then Igiko users will be able to create their own virtual machines that are a copy of yours, but at the same time specify their server name and administrator credentials.
Additionally, you can enable the automatic setting of network adapter parameters (IP address, DNS server, and Default gateway) without using DHCP. Link to the article on this feature.
The template can be either non-configurable, when creating a VM, a copy of a previously created VM is actually created, or configurable, when you can additionally set your own settings for the server name, administrator credentials, and network interface for the copy.
Next, we will describe the nuances of creating virtual machines that will be used for custom templates and how to add templates to Igiko.
Note: When creating a VM from a template, you can select the disk size. The size of this disk cannot be less than the size of the occupied space on the disk of the virtual machine that is the template. Therefore, in some cases, it is worth creating a virtual machine for the template with a small disk, so that it can then be expanded depending on the user's desire.
Creating a Windows vm for a configurable template
Let's demonstrate the creation of a virtual machine on Windows for a configurable template, using Windows 10.
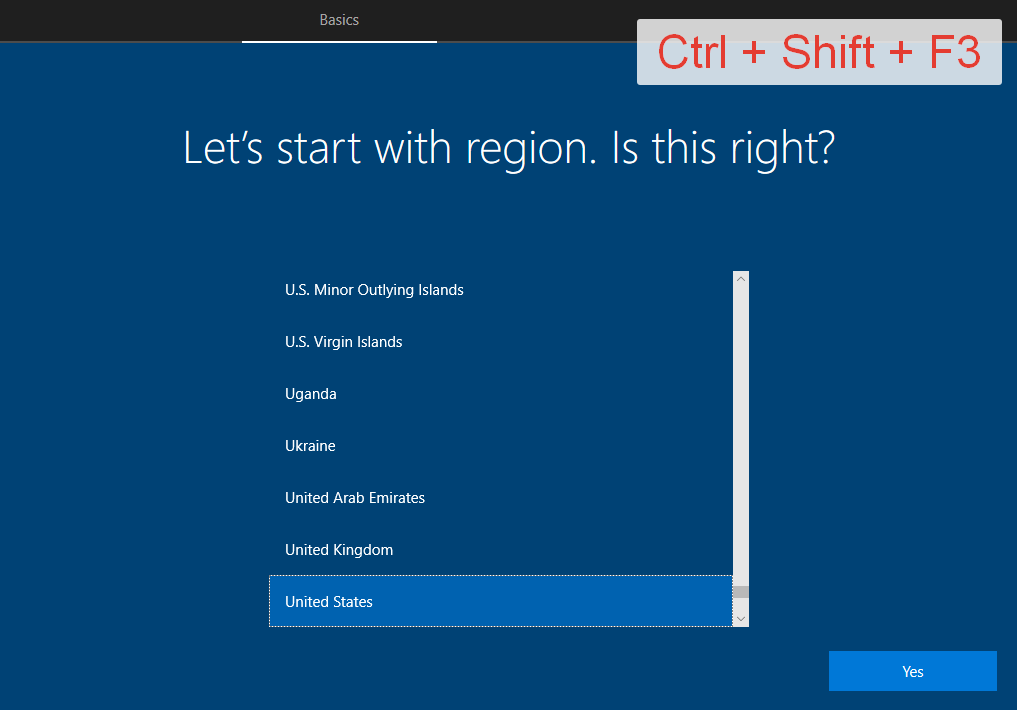
Create a virtual machine, connect the installation image, install to disk, and proceed to the initial system configuration stage (OOBE screen), as shown in the image below.
Click on the keyboard shortcut Ctrl + Shift + F3 (on laptops, you may additionally need to press the Fn key) to switch to audit mode. In this mode, you will log in as an Administrator user, with which you can make changes to the system.
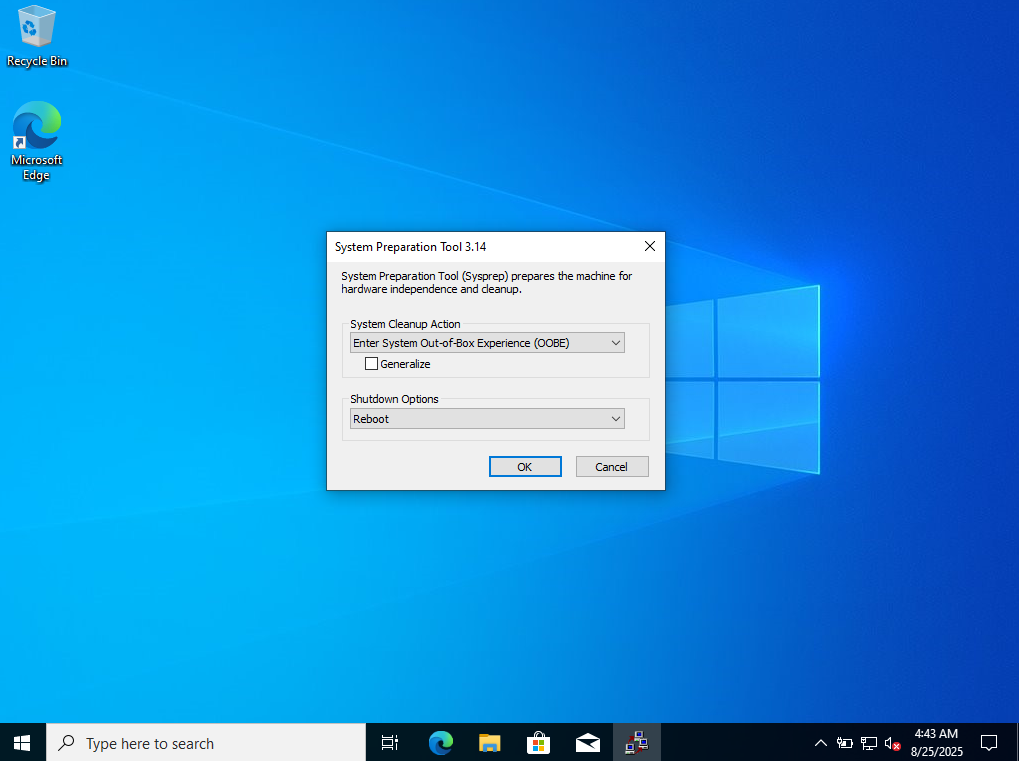
The audit mode entry screen is shown below.
After logging in, the System Preparation Tool window will open. It will be needed to prepare the system. If you close it, restart the VM.
Now you can make changes to the system, such as installing the necessary software. Make sure that you install it for all users, as the current user will be deleted.
Tip: Use check points when creating templates. If you make a mistake at some stage, you can easily roll back to the moment when they didn't exist.
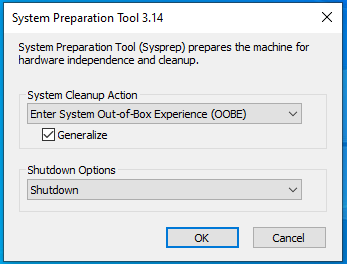
After installing the software, set the settings in the System Preparation Tool window as shown in the picture below. Select the Enter System Out-of-Box Experience (OOBE) value in the System cleanup action, set the Generalize checkbox, and select Shutdown in the Shutdown options. Click OK.
If you have used checkpoints, they must now be removed. There should be only one in the virtual disk files of the virtual machine .vhdx or .vhd file, without .avhdx and .avhd files. The resulting disk will then be used when adding the template to Igiko.
Using the network adapter auto-configuration feature
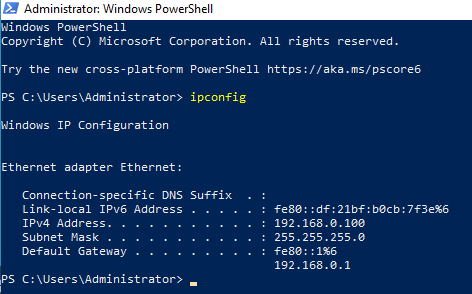
If you plan to use the system image together with the enabled network adapter auto-configuration feature, then at the software installation stage, make sure that the system has a network adapter called Ethernet. Sometimes the name of the network adapter can be Ethernet 0 or another, in which case it should be renamed.
To check, for example, you can use powershell and enter the ipconfig command. The command should output the adapters, and at least one of them (which will actually be configured) should be called Ethernet. An example of a valid configuration is shown below.
Creating a Ubuntu vm for a configurable template
Let's consider creating a virtual machine template with a Linux distribution, using Ubuntu Server 24 as an example.
Create a virtual machine, connect the installation image of the Ubuntu server version, install the system, while creating a user from whom you will configure the template.
Configuring templates on Linux is done using Cloudinit, which is already built into Ubuntu Server. Install the Cloudinit package if your distribution does not have it.
Now you can make changes to the system, such as installing packages.
After making all the changes to the system, run the command:
cloud-init clean
Next, you need to delete the current system user under whom you performed the configuration. To do this, enable the root user if it is disabled, as for example by default in the Ubuntu distribution:
sudo passwd root
After this command, you need to enter the password for the root user twice (you can use any password if you disable it later).
Log out from under the current user and log in as root.
Delete the user under whom you configured the system:
sudo userdel -r <username>
Disable the root user (recommended):
sudo passwd -d root
Turn off the VM and delete the checkpoints if you have used them. There should be only one in the virtual disk files of the virtual machine .vhdx or .vhd file, without .avhdx and .avhd files. The resulting disk will then be used when adding the template to Igiko.
Using the network adapter auto-configuration feature
If you plan to use the system image together with the enabled network adapter auto-configuration feature, make sure that the system has a network adapter named eth0. The settings will be applied only for the adapter with the given name.
Creating a VM for a non-configurable template
If the template does not need to be configurable, then no preparation is required for it. You can use any virtual disk.
Adding VM templates to Igiko
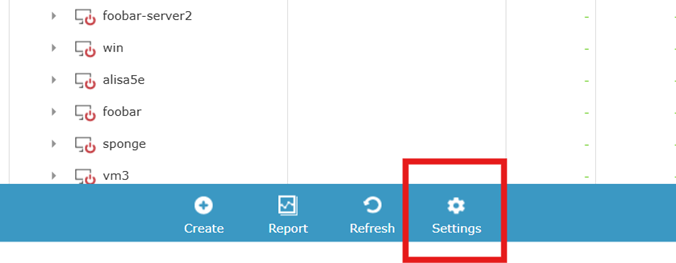
To add templates to Igiko, go to the virtual machines page using the menu on the left. Click on the Settings button at the bottom. Please note that none of the VMs are selected in the table, as in this case the button is hidden.
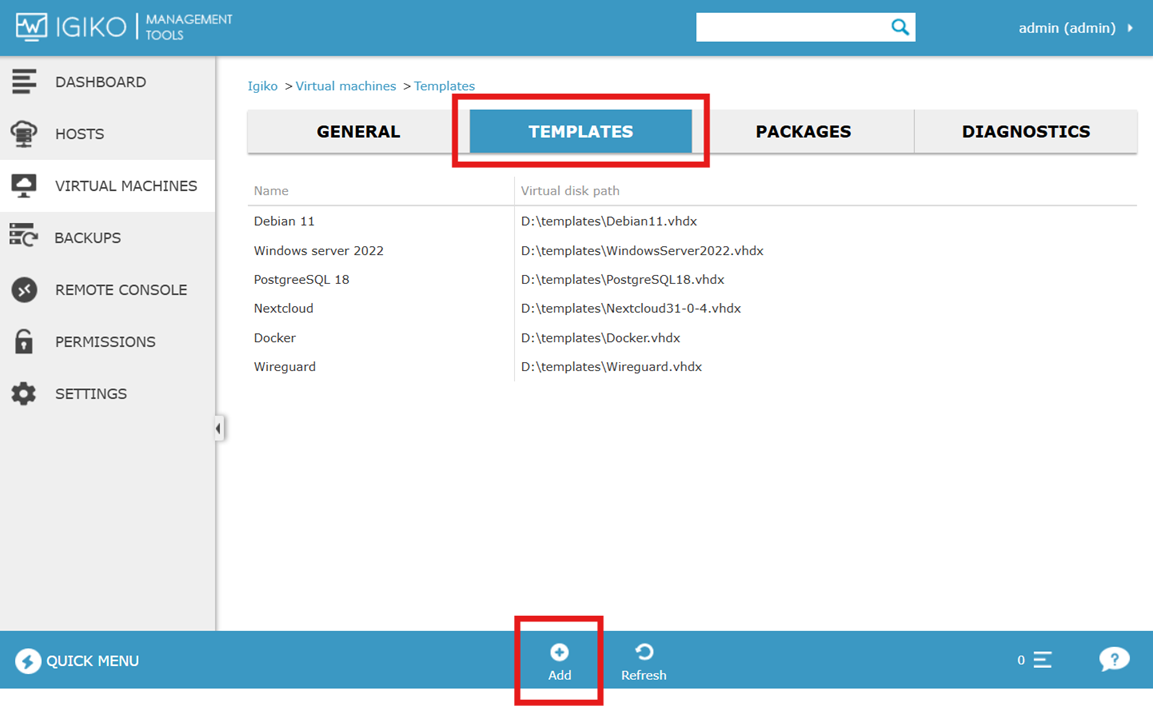
Then go to the Templates tab, and click the Add button at the bottom.
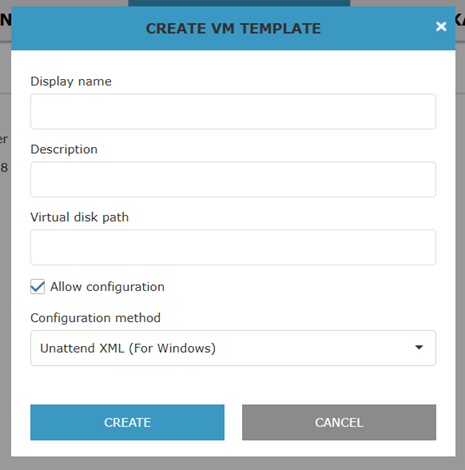
In the window that opens, you need to specify:
Template name and description that will be visible to users.
The path to the virtual disk that should lead to the .vhd or .vhdx file, and must exist in the system, otherwise you will not be able to create a template.
Whether to allow template configuration. If this feature is enabled, then when creating a VM, the user will be able to independently enter the administrator's name and password, as well as specify the computer name.
If configuration is allowed, then you need to specify the method that this configuration will be performed. Currently, two methods are supported, the choice of which depends on the OS that is installed on the virtual disk.


